

























Crypto Games ExtensionCrypto Games AppTelegram NewsSubmit

GTA 6 guides

30 new in the last 5 daysAll →
GTA 6 Gang Operations: All 39 Robberies and Pest ControlGTA 69 hours agoGTA 6 Gang Operations: All 39 Robberies and Pest ControlGTA 6 Street Racing With Yago: Unlock and RewardsGTA 610 hours agoGTA 6 Street Racing With Yago: Unlock and RewardsGTA 6 Gone Fishing Walkthrough: Rescue DonnieGTA 611 hours agoGTA 6 Gone Fishing Walkthrough: Rescue DonnieGTA 6 Kingpin Bowling: Valuables, Safe and Trophy GuideGTA 611 hours agoGTA 6 Kingpin Bowling: Valuables, Safe and Trophy GuideGTA 6 Mami Knows Best: Catch Up With Mia WalkthroughGTA 611 hours agoGTA 6 Mami Knows Best: Catch Up With Mia WalkthroughGTA 6 The Impaler: How to Steal the Police CarGTA 612 hours agoGTA 6 The Impaler: How to Steal the Police CarGTA 6 Hometown Heroes: Steps, Rewards and The Lone RiderGTA 613 hours agoGTA 6 Hometown Heroes: Steps, Rewards and The Lone RiderGTA 6 Eddie Acosta Party: Pay the $50,000 or Refuse?GTA 613 hours agoGTA 6 Eddie Acosta Party: Pay the $50,000 or Refuse?GTA 6 First Person: Is There a First-Person View?GTA 614 hours agoGTA 6 First Person: Is There a First-Person View?GTA 6 100% Completion: Thresholds and the Missable TrophyGTA 615 hours agoGTA 6 100% Completion: Thresholds and the Missable TrophyGTA 6 Stats: How to Raise Health, Stamina and FocusGTA 615 hours agoGTA 6 Stats: How to Raise Health, Stamina and FocusGTA 6 Criminal Profile Explained: All Five LevelsGTA 616 hours agoGTA 6 Criminal Profile Explained: All Five LevelsGTA 6 Key Cloner: Steal Supercars and Sell to RandyGTA 617 hours agoGTA 6 Key Cloner: Steal Supercars and Sell to RandyGTA 6 Personal Car: How to Keep and Summon Your OwnGTA 617 hours agoGTA 6 Personal Car: How to Keep and Summon Your OwnGTA 6 Weapon Shops: Launchers, Snipers, Armour, ParachuteGTA 618 hours agoGTA 6 Weapon Shops: Launchers, Snipers, Armour, ParachuteGTA 6 Unfog Map: Fastest Way to Reveal LeonidaGTA 619 hours agoGTA 6 Unfog Map: Fastest Way to Reveal LeonidaGTA 6 Tank and Fighter Jet: Where to Steal ThemGTA 619 hours agoGTA 6 Tank and Fighter Jet: Where to Steal ThemGTA 6 Switch Characters: How to Play as Jason and LuciaGTA 620 hours agoGTA 6 Switch Characters: How to Play as Jason and LuciaGTA 6 Fast Travel: Taxi, RydeMe and What It CostsGTA 620 hours agoGTA 6 Fast Travel: Taxi, RydeMe and What It CostsGTA 6 Bank Robbery Guide: Banks and Vaults Up to $205,000GTA 621 hours agoGTA 6 Bank Robbery Guide: Banks and Vaults Up to $205,000GTA 6 PC Release Date, File Size and Preload ExplainedGTA 621 hours agoGTA 6 PC Release Date, File Size and Preload ExplainedGTA 6 Impound Guide: How to Get Your Car BackGTA 621 hours agoGTA 6 Impound Guide: How to Get Your Car BackGTA 6 keeps your 100% stats hidden until the end for a good reasonGTA 622 hours agoGTA 6 keeps your 100% stats hidden until the end for a good reasonRockstar says GTA 6's unrealistic mountains had to be in the gameGTA 622 hours agoRockstar says GTA 6’s unrealistic mountains had to be in the gameGoodbye Lucia, GTA 6 fans' official new obsession is MandyGTA 622 hours agoGoodbye Lucia, GTA 6 fans’ official new obsession is MandyGTA 6's cops will remember you, thanks to its Heat systemGTA 623 hours agoGTA 6’s cops will remember you, thanks to its Heat systemGTA 6 cheats stay locked until you finish the gameGTA 623 hours agoGTA 6 cheats stay locked until you finish the gameRockstar president Sam Houser marks GTA 6 launch with rare statementGTA 623 hours agoRockstar president Sam Houser marks GTA 6 launch with rare statementGTA 6's reported DualSense trick for staying under the speed limitGTA 624 hours agoGTA 6’s reported DualSense trick for staying under the speed limitWhat we know about GTA 6's returning cheat codesGTA 624 hours agoWhat we know about GTA 6’s returning cheat codes
Every treasure map location in Pokémon Pokopia's Bubbly Basin DLCImage Source: Polygonimages

Every treasure map location in Pokémon Pokopia’s Bubbly Basin DLC

George Tsagkarakis Updated 4 min read
Contents 8 sections
We may include affiliate links in our content, meaning we could earn a commission—or receive blockchain-based assets—if you click a link and make a purchase or take a specific action. Additionally, we use generative AI to help draft and refine our posts for clarity and grammar. All content is fact-checked and reviewed by a human editor before publication.

Six treasure maps. Six decorative Poké Balls. One Starmie who won’t move into your town until you’ve found all of them.

That’s the actual deal with Bubbly Basin’s treasure hunt, and it’s worth knowing up front because the maps themselves are almost beside the point.

Treasure maps in Pokémon Pokopia are collectibles you pull out of the shining spots that spawn daily on the Bubbly Basin map. They point you toward treasures humans left behind before they disappeared.

But here’s the part the game doesn’t advertise: you don’t need the maps at all. The treasure sits in the same place whether or not you’re holding the paper that describes it. You can walk straight to every one of these spots right now.

pokopia_guide_treasuremap_map1_1
Every treasure map location in Pokémon Pokopia's Bubbly Basin DLC 1 Every treasure map location in Pokémon Pokopia's Bubbly Basin DLC

Six maps are scattered across the region, and they’re DLC-only. You’ll find them at random while digging the glowing ground spots, the same ones that usually cough up relics, fossils and mysterious slates.

pokopia_guide_treasuremap_map1_2
Every treasure map location in Pokémon Pokopia's Bubbly Basin DLC 2 Every treasure map location in Pokémon Pokopia's Bubbly Basin DLC

Map one hides behind a wall of blue rocks

Reward: Decorative Great Ball.

Head to the bathing house next to the Pokémon Center in Bubbly Basin. Take the stairs on its left side down, then walk past the bench and look for a wall of blue rocks.

pokopia_guide_treasuremap_map1_3
Every treasure map location in Pokémon Pokopia's Bubbly Basin DLC 3 Every treasure map location in Pokémon Pokopia's Bubbly Basin DLC

Smash it. There’s a secret room back there with the decorative Great Ball inside.

The second one is buried under the coral

Reward: Decorative Heal Ball.

This treasure sits in an underground room northeast of the ocean temple. Swim past the tall red-roofed building to reach the area where you meet Barboach during the “Build the Beautiful Building!” important request.

Start breaking the ground blocks near the large coral and keep going down. Eventually you’ll open into the room holding the decorative Heal Ball.

Map three doubles as your shortcut later

Reward: Decorative Dive Ball.

The third treasure is near the abandoned gym in Bubbly Basin. Go east of the main square and you’ll hit a wall of dirt blocks. Break through it and follow the path to the gym.

Stand in front of the building, turn south, and destroy the wall of star-spotted rocks. The room behind it has the decorative Dive Ball.

Remember this location. You’ll want it again at the end.

Nets, tracks and blue crystals

Reward: Decorative Net Ball.

Make for the cave northwest of the main square. It’s the same place you met Frillish during the “Build the Beautiful Building!” important request.

Past the entrance, jump back into the water. You’ll reach a room where nets block the path. Break them and keep heading down.

When you land in a room with tracks and blue crystals, check the southeastern side for a wall of blue rock. Dig a path through the blocks and the decorative Net Ball is waiting.

Look for the yellow mailbox

Reward: Decorative Lure Ball.

The fifth treasure sits near a house with a yellow mailbox out front. Only one place on the map fits that description: the northeast side, where you find the portal pods.

Once you’re at the house, dig on the west side of the building near some coral. That’s the room with the decorative Lure Ball.

The last one is a ruin in the south

Reward: Decorative Quick Ball.

Head to the southern part of the map, near the Bubbly Basin gate. From the gate, travel north, go down the stairs, then turn west.

You’ll spot the remains of a house with a wall of star-spotted rocks behind it. Break the rocks and the decorative Quick Ball is in the room beyond.

What all six Poké Balls are actually for

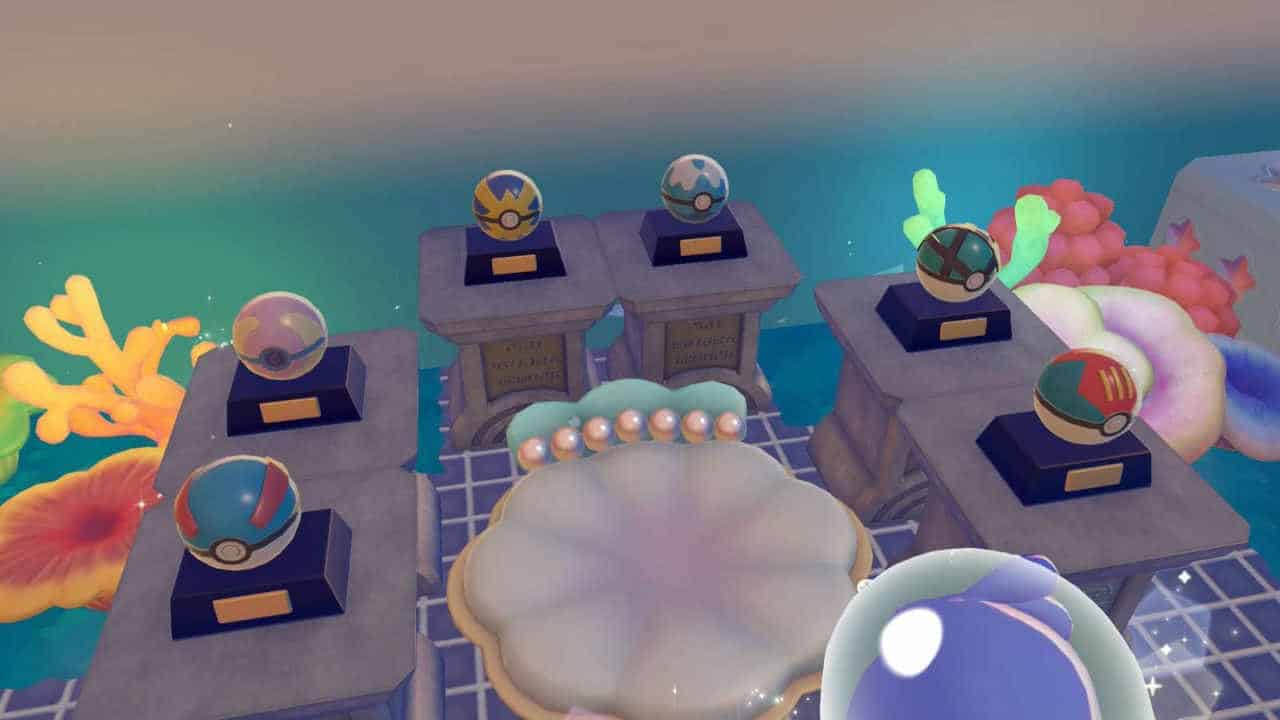
Poking around Bubbly Basin for its secrets is fun on its own. But the six decorative Poké Balls are the real payoff, because together they let you build the “mermaid’s gym” habitat.

That habitat is Starmie’s home. No balls, no Starmie.

Here’s what you need to put it together.

The fast way to assemble it: return to the abandoned gym from Treasure Map #3, east of the main square. Inside are the six exhibition stands you need.

Place your six decorative Poké Balls on top of the stands in any order. Order doesn’t matter.

After that, the only thing left on your list is a marine sofa, and you probably already have that recipe sitting in your book.

Then go stand in your new gym and wait for a Starmie to decide your town is worth living in.

Share this article
George Tsagkarakis

George Tsagkarakis, known as Staycalm4now is a professional author in the crypto gaming industry since early 2018. He has experienced all the growth of Blockchain Gaming and helped multiple projects achieve their goals and established a player base. He is the co-founder of egamers.io and now the Founder and owner of CryptoGames.gg He is also the COO of MyStage, an…

More from Nintendo

Leave a Reply